Ooooh, lots to blog about, we’ve had a busy few weeks! In no particular order: Annie’s 4th Birthday, dance performance, temple night, Primary Program, Relief Society lesson, Disney Princesses on Ice, helping with PTA stuff, Parent Teacher Conference, parties, photo sessions, meetings of various kinds, Brandon won a CEO award at school….and we celebrated my Grandma’s 90th birthday with a big open house on Saturday! I gathered photos and memories from all of the families and designed a special memory book for her and was SO happy with how it turned out—that is how I spent a huge part of my entire week last week, and it was worth it.  I will post about that and other fun events later. So you see why blogging has taken a back seat while life is happening! But before Thanksgiving is over and it’s too late, I wanted to share 2 little Thanksgiving projects, one I made last year, and one I finished TODAY.
Thanksgiving Canvas
I love making things in photoshop using digital scrapbooking supplies, then combining them with other mediums, such as canvas and ribbon. I created this in photoshop using a scripture that I love from the Book of Mormon (Alma 34:38)—Live in thanksgiving daily.
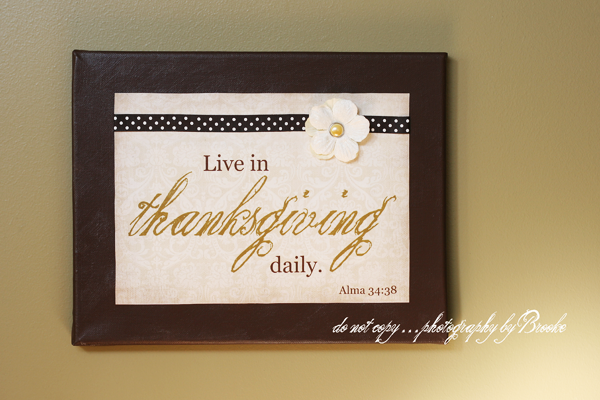 I LOVE that and really need to apply it in my life on a daily basis! So I needed to make a cute reminder. I printed it at Costco on luster paper. Meanwhile, I had a canvas just sitting around, so I painted it dark brown, and once I picked up my photo I used Mod Podge to stick it on the canvas. I also added a polka dot ribbon and Mod Podged that baby right on too. Mod Podging is a verb, people. I love that stuff. I added a layer of Mod Podge on top of everything, and instead of doing a carefully thin perfect layer, I did it messy and cross-hatched, so I could get more of a textured look. Last of all, I added a small velvety flower to finish it off. I love how it looks hanging on my wall!!! It makes me happy and it was super easy. This is something that I can keep up all year long to remind me how blessed we are and to give thanks every single day.
Thankful Banner
 I made this project last year for the Oct. 2008 issue of Bella Scraps Magazine, and thought I’d share the tutorial here just for funsies.
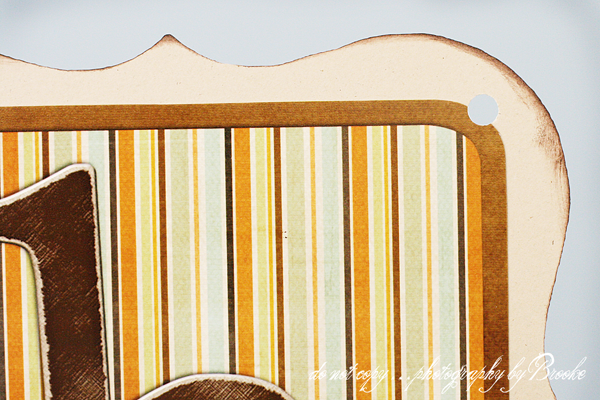
Materials: printed layouts, coordinating cardstock, adhesive, hole punch, distress ink, various ribbons
Step 1: Create your letter layouts in your photo editing program. I was making the word “thankful” so I made 8 little coordinating mini layouts. I knew I wanted my mounted letters to be 6 inches x 6 inches when finished, so I created my layouts at about 5.25 inches by 5.25 inches so I could have my cardstock mat provide a nice border.
 Step 2: Print layouts and cut them out. I used the luster photo paper at Costco, that’s my favorite. For the cardstock mats, I used my QuicKutz Silhouette to cut out the various shapes (bracket, scallop, circle, and rounded square). It saved me tons of time but you could make any shape you wanted and cut by hand, or even use chipboard pieces as your mats. I’ve seen cute banners that use triangles.
Step 3: Adhere the layouts to the shaped cardstock with your favorite acid-free adhesive. You could use double-sided sticky tape, glue sticks, Mod Podge, or Zyron machine, whatever floats your boat! Then punch a hole in the top 2 corners of each layout. I made my holes about 1/2 inch in. I also inked up the edges of the cardstock with distress ink.
 Step 4: Now it’s time to string up the banner. I cut my ribbon to a 7 foot length (I laid out my banner and allowed enough ribbon for a few inches in between each letter and about 12 inches on each end for hanging up). Then I threaded the ribbon through all of the holes in the tops of the layouts until they were all strung together. I used about a 3/4 inch wide ribbon and it was very easy to thread through the holes. Knot the ends to secure.
 Step 5: Add coordinating ribbon as accents to the banner. I wanted to keep it simple so I just added some green ties in between each letter.
Step 6: Hang up your banner and enjoy! It’s a fun way to use digiscrapping in your home decor. Credits: Shabby Princess “Autumn Medley” and “Harvest Spice” papers; GG Digital Designs “Fall Fun” chipboard letters
![]()
*********************************************************
Well, gotta run. I’m in organization mode today, and while Haylie’s napping I’ve got to get a move on! (As you can guess, Haylie like to “un-do” my organizing!) I’ll be back hopefully tomorrow with a post, it’s on my to-do list.
Have a great day!


{ 16 comments… read them below or add one }
You and your endless supply of creativity and talent! I LOVE IT! Thanks so much for sharing! Happy Turkey Day!
Hey I just stumbled on to your blog and totally love it! It immediately went on my Google Reader. I love the post with the family proclamation template and was wondering if you would be willing to share the download with me by e-mail. I am thinking this would make a great Christmas present for my parents! Thanks for sharing your talents. I also live in Utah and love the pictures you took of your brother and his fiance. Where did you take those? Also if you are willing to share the location! Sometimes the photographer likes to have some secrets!
Here's routing for your "to-do" list. I love to read your posts. Creative girly. Love it all. I need to call you about your printer. I have gone through THREE and they all were terrible. Can't a girl just buy a printer and print cute stuff? Too much to ask. I know. That was random. Especially since you said that you printed it at Costco. No. Nobody has yet to account for my brain since the twin pregnancy. Crazy!!!!
I loOoOoOoOove that banner! You make such fun things!
julie told me about the thanksgiving quote and how cute it was! She was right! So cute!
TOTALLY INSPIRING! Thanks for sharing all your awesome ideas and projects!
I really love the banner! It's awesome.
I adore your Thanksgiving projects. Thanks for sharing!
I am thankful for you and all of your inspiring projects!!!
You are so cute. And I am way nice. You should totally make me one of those Thanksgiving things.
Hi,
I am a complete stranger…but fellow member of the lds church. I would love to make the live in Thanksgiving daily, but, I do not have the computer ability to do so. Are you willing to share the file? If it is at all possible would you email me? loriaustinbuss@hotmail.com
THANKS
So cute!!!
I would love to try this. I’ll have to cut by hand though. It turned out really cute.
Really loved the Thanksgiving Banner! Thanks for the tutorial – I will definitely be making this for my home.
Great projects! I especially like the ‘thankful’ banner with all its great fall colors and dimension/distressing!
I really like the banner! I am certainly not crafty when it comes to scrapbooky stuff or paper, but I love to look at well-made projects and dream 😉 Great job!